How to use Neptune with DALEX#
![]()
DALEX is an open source tool for exploring and explaining model behavior to understand how complex models are working. With Neptune, you can upload the following DALEX metadata:
- The pickled dalex explainer object
- Interactive reports
This guide is adapted from the DALEX documentation .
Before you start#
- Sign up at neptune.ai/register.
- Create a project for storing your metadata.
-
Have dalex and Neptune installed.
To follow the example, also install pandas and scikit-learn.
Passing your Neptune credentials
Once you've signed up and created a project, set your Neptune API token and full project name to the NEPTUNE_API_TOKEN and NEPTUNE_PROJECT environment variables, respectively.
To find your API token: In the bottom-left corner of the Neptune app, expand the user menu and select Get my API token.
Your full project name has the form workspace-name/project-name. You can copy it from the project settings: Click the
menu in the top-right →
Details & privacy.
On Windows, navigate to Settings → Edit the system environment variables, or enter the following in Command Prompt: setx SOME_NEPTUNE_VARIABLE 'some-value'
While it's not recommended especially for the API token, you can also pass your credentials in the code when initializing Neptune.
run = neptune.init_run(
    project="ml-team/classification",  # your full project name here
    api_token="h0dHBzOi8aHR0cHM6Lkc78ghs74kl0jvYh...3Kb8",  # your API token here
)
For more help, see Set Neptune credentials.
Creating and logging an explainer object#
-
Prepare the data.
import dalex as dx import pandas as pd from sklearn.neural_network import MLPClassifier from sklearn.preprocessing import StandardScaler, OneHotEncoder from sklearn.impute import SimpleImputer from sklearn.pipeline import Pipeline from sklearn.compose import ColumnTransformer import warnings warnings.filterwarnings("ignore") data = dx.datasets.load_titanic() X = data.drop(columns="survived") y = data.survived data.head(10) -
Create and fit a pipeline model.
numerical_features = ["age", "fare", "sibsp", "parch"] numerical_transformer = Pipeline( steps=[ ("imputer", SimpleImputer(strategy="median")), ("scaler", StandardScaler()), ] ) categorical_features = ["gender", "class", "embarked"] categorical_transformer = Pipeline( steps=[ ("imputer", SimpleImputer(strategy="constant", fill_value="missing")), ("onehot", OneHotEncoder(handle_unknown="ignore")), ] ) preprocessor = ColumnTransformer( transformers=[ ("num", numerical_transformer, numerical_features), ("cat", categorical_transformer, categorical_features), ] ) classifier = MLPClassifier( hidden_layer_sizes=(150, 100, 50), max_iter=500, random_state=0 ) clf = Pipeline( steps=[("preprocessor", preprocessor), ("classifier", classifier)] ) clf.fit(X, y) -
Import Neptune and start a run:
-
If you haven't set up your credentials, you can log anonymously:
If Neptune can't find your project name or API token
As a best practice, you should save your Neptune API token and project name as environment variables:
Alternatively, you can pass the information when using a function that takes
api_tokenandprojectas arguments:run = neptune.init_run( api_token="h0dHBzOi8aHR0cHM6Lkc78ghs74kl0jv...Yh3Kb8", # (1)! project="ml-team/classification", # (2)! )- In the bottom-left corner, expand the user menu and select Get my API token.
- You can copy the path from the project details ( → Details & privacy).
If you haven't registered, you can log anonymously to a public project:
Make sure not to publish sensitive data through your code!
-
-
Create an explainer for the model:
-
Upload the explainer to Neptune.
You can use DALEX's
dumps()method to get a pickled representation of the explainer, then upload it to Neptune using Neptune'sfrom_content()method. -
To stop the connection to Neptune and sync all data, call the
stop()method:
Logging model level explanations#
model_performance()#
This function calculates various Model Performance measures:
- Classification: F1, accuracy, recall, precision, and AUC.
- Regression: mean squared error, R squared, median absolute deviation.
You can upload these ROC plots to Neptune by setting the show argument to False.
To distinguish between the plot types, you can use different namespaces. For example, "model/performace/roc", "model/performance/ecdf", etc.
Related
Learn more about Neptune Namespaces and fields.
model_parts()#
This function calculates Variable Importance.
You can also calculate variable importance of a group of variables:
vi_grouped = exp.model_parts(
    variable_groups={
        "personal": ["gender", "age", "sibsp", "parch"], "wealth": ["class", "fare"]
    }
)
vi_grouped.plot()
Upload variable importance plots to Neptune:
run["model/variable_importance/single"].upload(vi.plot(show=False))
run["model/variable_importance/grouped"].upload(vi_grouped.plot(show=False))
model_profile()#
This function calculates explanations that explore model response as a function of selected variables.
The explanations can be calculated as Partial Dependence Profile or Accumulated Local Dependence Profile.
pdp_num = exp.model_profile(type="partial", label="pdp")
ale_num = exp.model_profile(type="accumulated", label="ale")
pdp_num.plot(ale_num)

pdp_cat = exp.model_profile(
    type="partial",
    variable_type="categorical",
    variables=["gender", "class"],
    label="pdp",
)
ale_cat = exp.model_profile(
    type="accumulated",
    variable_type="categorical",variables=["gender", "class"],
    label="ale",
)
ale_cat.plot(pdp_cat)
Upload model profile plots to Neptune:
run["model/profile/num"].upload(pdp_num.plot(ale_num, show=False))
run["model/profile/cat"].upload(ale_cat.plot(pdp_cat, show=False))
Logging prediction level explanations#
Let's create two example persons for this tutorial.
john = pd.DataFrame(
    {
        "gender": ["male"],
        "age": [25],
        "class": ["1st"],
        "embarked": ["Southampton"],
        "fare": [72],
        "sibsp": [0],
        "parch": 0,
    },
    index=["John"],
)

mary = pd.DataFrame(
    {
        "gender": ["female"],
        "age": [35],
        "class": ["3rd"],
        "embarked": ["Cherbourg"],
        "fare": [25],
        "sibsp": [0],
        "parch": [0],
    },
    index=["Mary"],
)
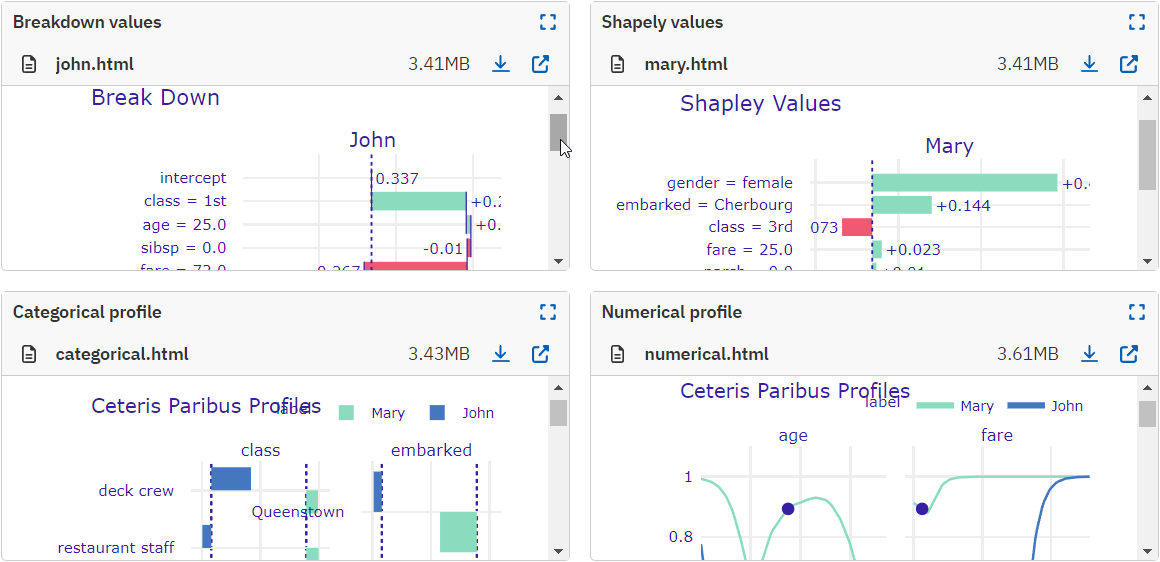
predict_parts()#
This function calculates Variable Attributions as Break Down, iBreakDown or Shapley Values explanations.
Model prediction is decomposed into parts that are attributed for particular variables.
Breakdown values for John's predictions:
bd_john = exp.predict_parts(john, type="break_down", label=john.index[0])
bd_interactions_john = exp.predict_parts(
    john, type="break_down_interactions", label="John+"
)
bd_john.plot(bd_interactions_john)
Shapely values for Mary's predictions:
Upload the plots to Neptune:
run["prediction/breakdown/john"].upload(
    bd_john.plot(bd_interactions_john, show=False)
)
run["prediction/shapely/mary"].upload(sh_mary.plot(show=False))
predict_profile()#
This function computes individual profiles; that is, Ceteris Paribus Profiles.
cp_mary = exp.predict_profile(mary, label=mary.index[0])
cp_john = exp.predict_profile(john, label=john.index[0])
cp_mary.plot(cp_john)
cp_john.plot(cp_mary, variable_type="categorical")
Upload the CP plots to Neptune:
run["prediction/profile/numerical"].upload(cp_mary.plot(cp_john, show=False))
run["prediction/profile/categorical"].upload(
    cp_mary.plot(cp_john, variable_type="categorical", show=False)
)
Analyzing the results#
Once you're done logging, stop the Neptune run to close the connection and sync the data:
Top open the run in Neptune, click the link that appears in the console output.
Sample output
[neptune] [info ] Neptune initialized. Open in the app: https://app.neptune.ai/workspace/project/e/RUN-1
In All metadata, navigate through the model and prediction namespaces to view the logged charts.